So now that you’re set up with a quality metronome (Part 1) and understand the basics of how rhythmic time is divided, (Part 2) lets actually start applying some of it and learning some moving patterns.
Notes on setup:
Since we are ready to play examples, you will need your electric or acoustic guitar. I advocate an electric with an amplifier with an adjustable volume control. This way you can set your instrument’s volume slightly softer than the volume of your metronome.
You’ll always want to start practicing without distortion. Think of a clean jazz tone… for you all you rockers that means switching to your rhythm/neck pickup (or bridge for more clarity at the expense of tone) and turning your tone knob down. Don’t worry; there are plenty of head bangin’ riffs to come \m/!
Additionally, you’ll want to turn off most of your effects, (unless you can set tempos and rhythms.) Delays, echoes and similar effects are based on time augmentation, and can disrupt and confuse you when you hear them (mili)seconds after you have played them.
Finally, I don’t recommend playing through a computer. Even if you have fancy recording equipment, computers suffer from latency (especially in Windows), and you will hear your sound up to a few seconds after you play it which will just be frustrating especially when working on time playing. If you must, lower the buffer size of your host program as much as possible to compensate for the latency since quality of tone isn’t as important right now as hearing just a clear sound.
Without further ado, lets get started:
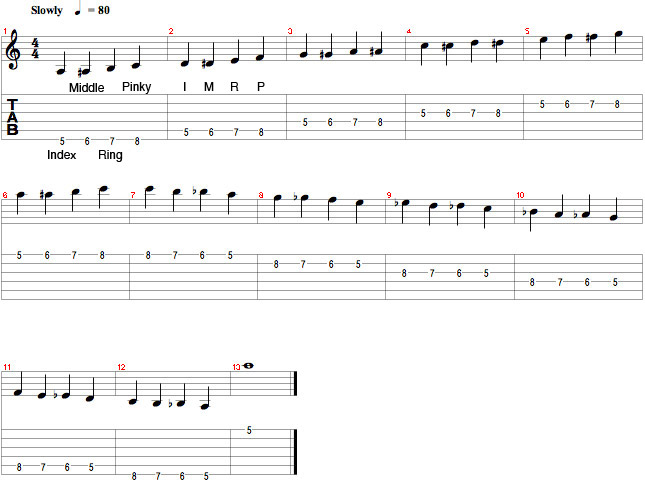
1) The licks in this chapter are a simple warm up routine. You can practice this routine for about fifteen minutes when you start your metronomic practice.
So everyone is on the same page: Turn your metronome on; set the tempo to 80 BPM and the time signature to 4/4. (4 beats per measure, the quarter note gets the beat.) We will now be playing quarter notes over the click of the metronome, so on every click we will play one note.
Start at the 5th Fret (A) on your low E string. In sequence you should use your first finger (index) to play all notes on the 5th fret, second finger (middle) to play all notes on the 6th fret, third finger (ring) to play all notes on the 7th fret, and your fourth finger (pinky) to play all notes on the 8th fret.
These examples serve no musical purpose and no contextual use – it is simply a warm up to get your blood flowing and your fingers moving independently.
Remember: You should be alternate picking these examples. Start with a down pick, followed by an up pick and repeat from there.
This is a nice leisurely pace for this example. If any of this is new to you, I recommend slowing the tempo down a few notches so you can hit each note cleanly and precisely, which is much more important than hitting every other one at twice the speed.
One last thing: Don’t forget to ‘feel’! Your internal sense of groove is integral to ‘internalizing the click.’
*Watch the repeat of the C (8) on your high E string in the 7th measure.
Example 1:
Audio 1
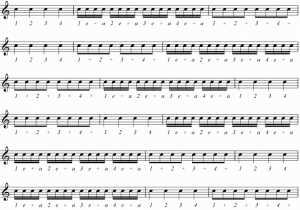
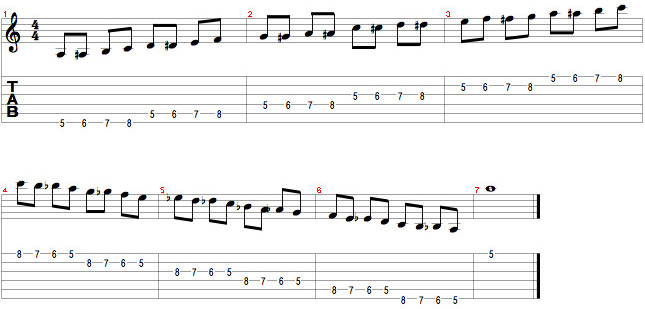
2) Once you have this pattern clean back and forth move on to the next example. We are going to use a different rhythmic subdivision, 8th notes. For every click of the beat we are going to play 2 notes. This will start to get harder, remember to alternate pick and lower the tempo if necessary. Think of a galloping horse and accent the beats themselves – Think- TA!-ta, TA!-ta, TA!-ta, TA!-ta
Example 2:
Audio 2
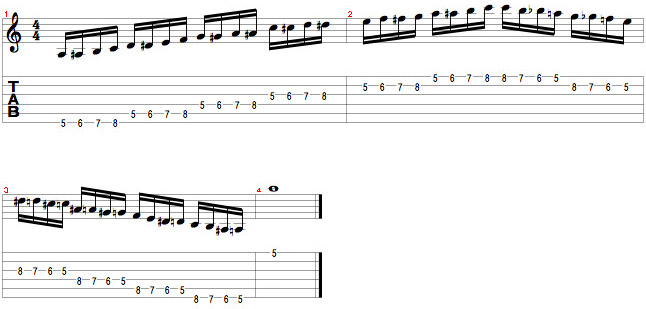
3) Now it may start to get hard. We are going to subdivide our rhythm into 16th notes, which means each click gets four notes. Alternate picking is vital here. Try to feel the beat and accent the first note in the group of four. Think – TA!-ta-ta-ta, TA!-ta-ta-ta, TA!-ta-ta-ta, TA!-ta-ta-ta.
Example 3:
Audio 3
4) Now that you can play these examples back and force with ease, reset your tempo to 80 BPM and we’ll begin mixing it up by using different fret numbers/fingers at different times instead of the normal order and repeat a new pattern up and back down the string sets.
Lets start with quarter notes on the click again. It is slow, but we are taking a different approach to warm up our fingers now. To save space these examples are only written ascending but remember to play them all descending as well.
Example 4:
Audio 4
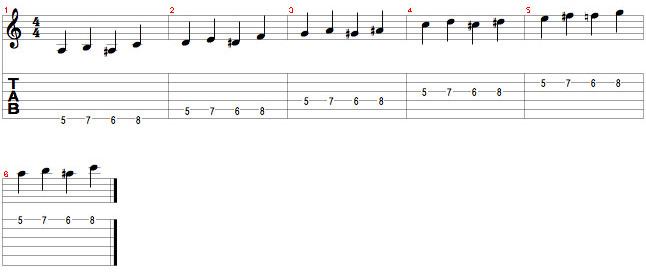
Once you have this down, try them again as 8th notes, and 16th notes.
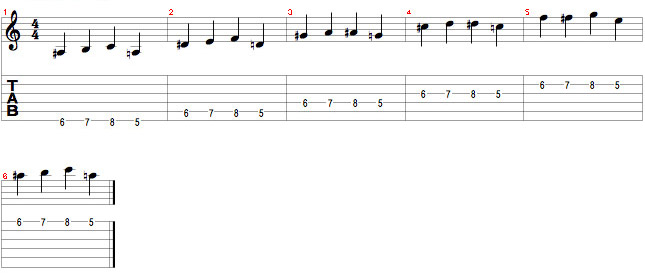
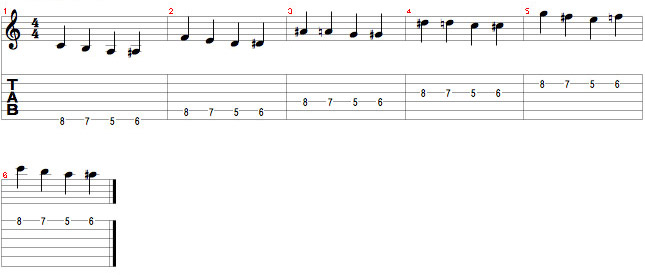
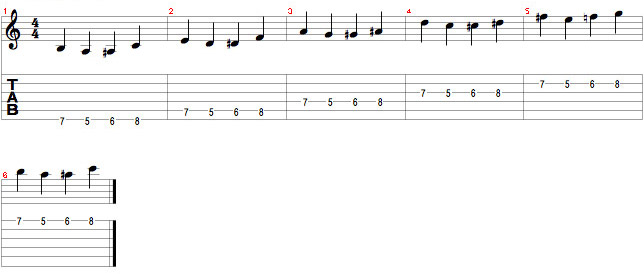
5) Now try these patterns as quarter notes, 8th notes, and 16th notes. Remember to play all examples back down as well. You may find them getting trickier and causing fumbling over notes- think of them like a tongue twister.
Example 5a:
Audio 5a
Example 5b:
Audio 5b
Example 5c:
Audio 5c
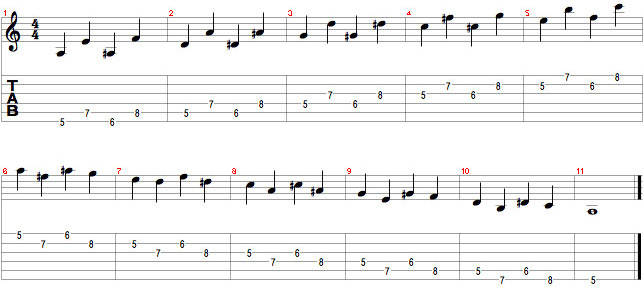
6) Now we are going to make things more interesting again- by extending these patterns over multiple string sets. Try the next three examples as quarter notes, 8th notes, and 16th notes. Remember: Clarity over speed, and accent the first subdivision! (These next examples are all displayed as 16th notes to save space.) Letter C may get tough as it involves string skipping. If any of these get too hard, move on and come back later to practice.
Economy and sweep picking may be a smarter choice for some of these examples. Follow the up/down pick markings to be sure.
Example 6a:
Audio 6a
Example 6b:
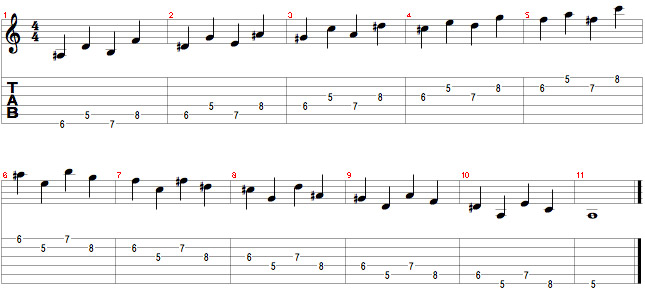
Example 6c:
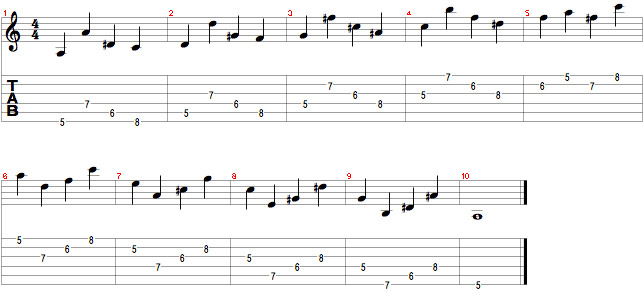
7) Lets add one more piece to the puzzle. We are going to mix up the subdivision of notes to practice switching back and forth between common rhythmic groupings. Try the next three examples and choose your tempo based on the speed of the fastest groupings of notes. Remember that these examples are not meant to sound like anything musical. We are practicing moving your fingers independently.
Example 7a:

Example 7b:

Example 7c:

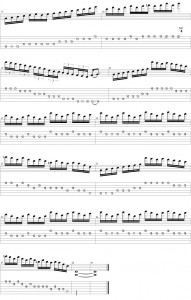
8.) For the last part of this exercise we are going to move the finger patterns that we have just learned across other sections of the guitar, since, obviously, not all music is played at 5th position. This one can be a doozy, so start slow and build up. Remember to start with quarter notes, then 8ths, and then 16ths. For every grouping of 4 frets (1-4) (5-8) (9-12) (13-16) etc. use fingers 1-4 respectively.
Example 8:
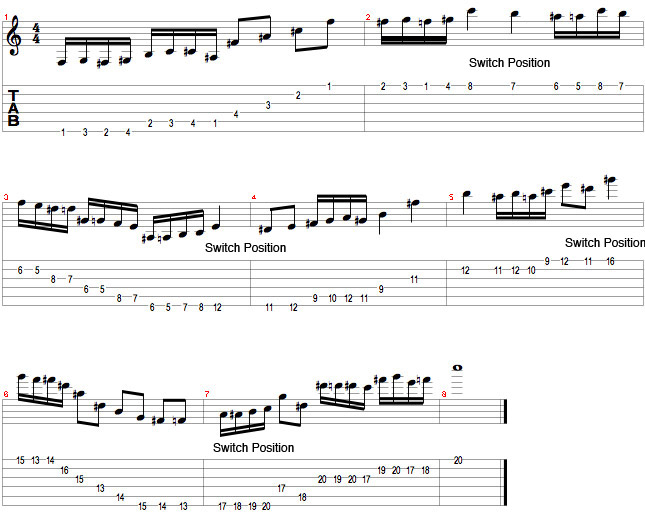
Now try making up your own patterns using multiple string sets, various finger patterns, and combinations of rhythmic subdivisions. Incorporate these patterns into your daily warm-up routines. After a week you will start to notice incredible changes in your sense of timing and rhythm.
In the next section we will get into finally playing musical lines with full band example tracks and live guitar.


