Welcome back, metal Guitar Messengers! The last lesson introduced you to some basic riff construction concepts based off of common chord diads and the palm muting technique. In this lesson, we’re going to dive right into some more advanced riff concepts. These include the use of tritones, bending techniques, and the use of palm-muted rests to create syncopated grooves. The riffs in this lesson are all in Drop D tuning, with the exception of Figure 3, which is in standard tuning. And as always, we’ll conclude the lesson with some essential metal albums that illustrate these concepts. Sound good? Let’s get started:
Adding Tritones
The tritone is an effectively sinister interval to use in metal riffs. At a certain time in classical music history, the tritone (also known as the ‘Devil’s interval’) was discouraged because of its dissonant tonal quality. The tritone is not pretty, but it’s distinctly metal. Bands like Black Sabbath and Slayer use tritones frequently to create an evil sound and melodic dissonance. This interval is not only found in metal, though. In fact, the common blues scale incorporates the tritone — called the ‘blue’ note in that context. The increased tension the tritone adds helps to give blues its unique flavor.
Theory time: the tritone by definition is an augmented 4th or diminished 5th. Say we’re in the key of A, with A being the root note. We know that the perfect fourth up from A is D. The tritone is D#, which is one half step up, making it an augmented 4th. Another way to look at it is to take the perfect 5th of A, which is E, and go a half step down, making it the diminished 5th Eb.
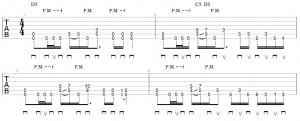
FIGURE 1
Figure 1 contains several tritones and can be picked exclusively with downstrokes. In Measure 1, slide your first finger to the root note, D on the 5th fret, 5th string. The following note is the tritone, Ab, on the 6th fret, 4th string. Use your second finger to fret this note. Do the same for the following note sequence, using your first and second fingers, and use plenty of vibrato to get the notes to ring into each other. In Measure 3, strike the 6th string, low D note to create a pedal tone and add even more dissonance.
Figure 1 – Slow
Figure 1 – Fast

Bending in Riffs
Bending is another cool way to add dimension and technical variety to your riffs. Although bending is primarily used for soloing and lead playing, rhythm players can also benefit from learning the technique to achieve a loose and bluesy feel. Before we get into an illustrative riff, let’s discuss the basics of the technique.
You can either have the bending motion go up toward the ceiling, or down toward the floor. Either way, the note pitch will rise. I recommend using an upward bending motion on the higher strings, and a downward bending motion when you are riffing on the lower strings and lower frets.
FIGURE 2
The important thing to know about bending is that if the notes aren’t bent to the correct pitch, you’ll sound sloppy. To practice bending to pitch, fret any note on the guitar. This will be your target pitch. For a half-step bend, go down one fret and bend it up until it matches the target pitch. Likewise, for a full-step bend, go down two frets and do the same thing. Eventually, your muscles will memorize the amount of pressure needed to bend a note to its target pitch. You can also bend and release, where you bend a note up to pitch and then return to the original tone, and you can prebend by bending the note before you hit the string with your pick.

Another thing to consider is practicing bends at different points on the guitar’s neck. If you are trying to bend up a full step, for example, the tension and amount of pressure it takes to make that bend will be greater on the lower frets and much less the higher you go up the neck. For larger bends, say a 1½ step bend, one finger alone may not be strong enough to get the note up to pitch. Therefore, instead of using your third finger by itself, fret your first and second fingers behind it for support.
Here’s how you can use bending in riffs: something I like to do is bend diads, which is something Dave Mustaine does frequently. Say for instance, you want to chromatically shift between a D5 and D#5 power chord. Instead of shifting the diad up from the 5th to the 6th fret on the 5th string, you can bend each note up a half step, creating the D#5. Depending on your string gauge and guitar tuning, bending diads can be tricky and it may take some time to develop the proper finger strength.
FIGURE 3
Figure 3 has two diads bent up a half step. In Measure 1, use your first and third fingers to fret the D5 power chord on the 5th and 7th frets of the 5th and 4th string, respectively. Using the same chord shape, slide up to the E5 power chord on the 7th fret and then bend both notes up a half step. This results in an F5 diad. Release back down to the E5 and slide back to the D5. In a similar fashion, bend the A5 power chord up to a Bb5, and release it back down. Finish the measure with a palm-muted chromatic gallop, ending on the F5.
For an added challenge, in Measure 1, see if you can play the first 5 chords by only picking the first D5. That is to say, pick the first D5, but with sliding and bending, try not to break the sequence of notes until you land back on the D5. This may be tricky at first, but with some strength building and practice, you’ll be good to go.
Figure 3 – Slow
Figure 3 – Fast

Effective Use of Rests and Syncopation
Entire lessons can be dedicated to syncopation, but to keep things relatively simple, syncopation occurs when rhythmic emphasis occurs against the pulse of the established beat. Accents can be placed on unstressed beats, and rests can offset riffs to become emphasized on the offbeat. When a riff shifts over the established pulse, you don’t anticipate the change and it can really grab your ears and attention. This kind of shift can also be considered cross-rhythm.
Say we are in 4/4 time, which is four beats per measure and the quarter note gets the beat. In an 8th note sequence, our brains naturally want to add an accent on the strong beats: ONE, and, TWO, and, THREE, and, FOUR, and. Syncopation occurs when the emphasis lies on the offbeat: One, AND, two, AND, three, AND, four, AND.
FIGURE 4
For a simple illustration, Figure 4 takes a palm-muted chugging 8th note sequence on the open 6th and 5th strings and incorporates rests at different points along the offbeat. This creates missed-beat syncopation.
To bring out the attack, you can down-pick each power chord. To cut off some of the notes completely, such as when a rest occurs, use your free left hand to place your fingers gently over the strings without pressing down. This will silence the notes and achieve the proper rest.
Figure 4 – Slow
Figure 4 – Fast

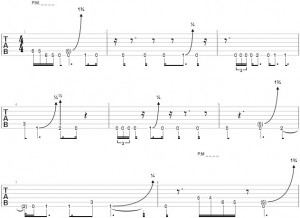
FIGURE 5
Taking the themes from this lesson, Figure 5 incorporates an un-palm-muted melody that containing a tritone, a half step bend and release, a bent-and-released power chord, and a chugging, syncopated groove formed by rests.
The riff is almost exclusively down-picked, with the exception of the alternate-picked note sequence in Measure 2. When bending the power chord on the 5th frets of the 6th and 5th strings, bar your first finger over the notes as you normally would, and pivot your wrist to achieve the half step bend. In Measure 4, make sure that the last diad on the 3rd fret is unmuted, and give it a nice accent by using vibrato.
Figure 5 – Slow
Figure 5 – Fast

Essential Listening
This lesson’s essential listening contains metal records from the 1970’s, 80’s and 90’s to illustrate a technical and musical progression from metal’s infancy to its modern experimentation. The guitarists featured on these albums, Black Sabbath’s Tony Iommi, Slayer’s Jeff Hanneman and Kerry King, and Meshuggah’s Mårten Hagström and Fredrik Thordendal have widely different styles, yet this lesson’s concepts can be found in each player’s techniques. Sabbath and Slayer are both big proponents of the tritone interval, and Meshuggah’s polyrhythmic creativity will give you a great indication of how syncopated riffs can be effective and extremely heavy.
Black Sabbath – Paranoid, 1970
 Many believe that Black Sabbath’s second record is one of their most seminal and influential records. Recorded in 1970, this album contains Sabbath’s iconic songs, ‘Paranoid,’ ‘War Pigs’ and ‘Iron Man,’ which contains one of the most universally recognizable guitar riffs next to ‘Smoke on the Water.’
Paranoid is a great listen, because not only is it heavy in the sense that they were crafting the genre that would become heavy metal, but it’s cool to hear how some of Tony Iommi’s early riffs have clearly influenced generations of metal guitar players. His approaches to string bending, blues licks and power chord progressions are relatively simple, yet distinct.
It seems Sabbath wanted to mimic the eeriness of horror movies and sought to create creepy rock music, and used the tritone to do so. In fact, it can be said that metal was born out of an accident:
Iommi severed the fingertips of his fretting hand in a factory accident, and subsequently crafted makeshift fingertips out of glass and leather. In order to fret the notes on his guitar, he tuned down his strings to ease the tension; this resulted in a detuned and heavy sound, thus beginning the development of heavy metal.
Slayer – Reign in Blood, 1986
 This is Slayer’s most famous and arguably best record. It’s 28 minutes of pure insanity, as the lads in Slayer speed through a no-holds-barred arsenal of pure American thrash metal. With a punk influence, Slayer’s faster approach to thrash set them apart from contemporaries like Metallica and Megadeth.
Fast, audacious, and considerably offensive, Slayer haven’t really let up in their decade-spanning career. Slayer’s style of thrash and tongue-in-cheek lyrics about Hell and Satan isn’t for everyone, but Reign in Blood is the one Slayer record you should own.
Another good example of tritone usage is in the iconic opening riff of ‘Raining Blood.’ Take notice of Kerry King and Jeff Hanneman’s palm-muting and picking techniques.
Because Slayer typically play at high tempos, most of their riffs need to be alternate-picked, because down-picking would be physically impossible. Slayer also like to trade off guitar solos, which are distinctly frenetic and at times harmonically off-putting.
Meshuggah – Destroy Erase Improve, 1995
 Meshuggah have an absolutely crushing sound and are masters at manipulating time and rhythm. Their second album, Destroy Erase Improve, defined them as rhythmic geniuses and a progressive force in the experimental metal realm. This album incorporates elements of thrash, death metal, and even some jazz fusion.
Because Meshuggah’s riffs are often offset to the drumbeats, you can easily lose track of where the strong beats are, which makes for some fascinating listening. It’s also natural to think that Meshuggah change time signatures frequently, which they do at times, but many of their riffs are written against a 4/4 feel in the drums, and only displaced rhythmically. Meshuggah go even further with rhythmic displacement by incorporating polyrhythms, which are competing meters set against each other, such as 3 against 2.
If complex rhythm is something you’re drawn to, Meshuggah are the guys to study. I would argue that they are one of the heaviest bands out there. In fact, I usually need to turn them off after 15 minutes… it’s just too much metal!
That concludes this lesson. Hopefully, these concepts will help shape your technique and give you some new ideas on how to approach riff writing. In the next lesson, I’ll introduce some fundamentals for more advanced techniques, such as sweep-picking, pinch harmonics and two-handed tapping. Now go start a band, experiment, play loud, and have fun!