The Concept
So, what are arbitrary chromatics? To say it simply, whenever you’re playing a minor (or major, or whatever mode) scale, in any position, you’ll have three tones on most of the strings, and two tones on one of the strings. This concept puts a chromatic passing tone on the string with two tones, so that each of the strings has three tones. This is great, especially for playing patterns or runs for several reasons:
- Three tones per string is a consistent pattern, meaning any pattern or run will be easier to play than it would be if one string had two tones.
- As opposed to playing regular scales in different positions, when you do it like this the scale does not stay the same – every position has a slightly different sound due to the passing note being different in every position.
- You get really interesting tonalities without necessarily knowing much about theory! You don’t have to know that the chromatic passing note is a b5, a 6, a b9 or whatever it is – it’s just a little spice that makes your playing less square.
The Lesson
I always try to keep things as simple as possible. I believe in giving students enough to understand the concept along with a couple of examples to get started with, and then encouraging them to be creative and make up phrases with it themselves! This lesson contains the following:
- The A Minor scale in three positions, starting on the 4th string. Nothing relevant to this concept happens on the bottom two strings, so I just leave them out for now.
- Three simple patterns in each of the positions.
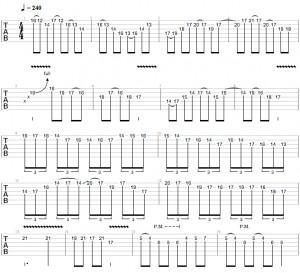
- Two cool licks that can be used in all positions
- A backing track for you to play these over! Remember that this is a simple concept, and the most important thing is that you understand it and get creative with it on your own. This is the backing track I play over throughout the lesson, and can be found in the Licks section of the lesson.
Scales
First of all, I’m going to play through the scales, starting with an A minor scale in the 5th position on the 4th string and continuing to the 7th and 9th positions.

Now I’ll add the 8th fret on the 3rd string to Figure One, the 7th fret on the 2nd string to Figure 2, and the 9th fret on the 2nd string to Figure 3.

Patterns
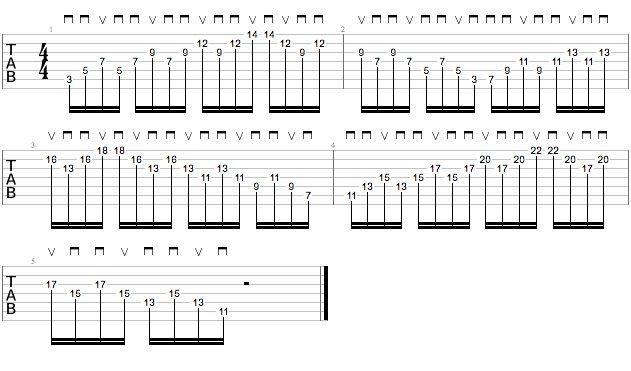
The first pattern is a dry and familiar one, but it becomes more interesting with the addition of the passing tones, especially when you mix up the subdivisions of the pattern. Note that all of the patterns can be played both ascending and descending.
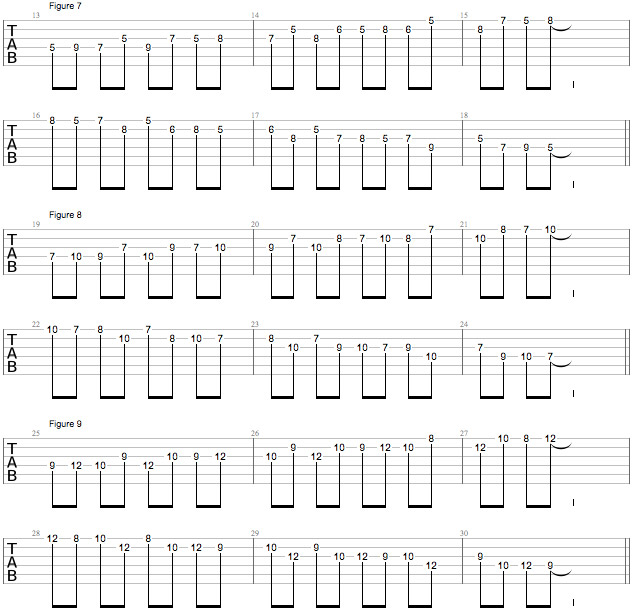
The second pattern sticks to one string per bar, making changing string easier than with the other two patterns. It’s also the only pattern to include rhythmic variation, which gives it a nice bounce.
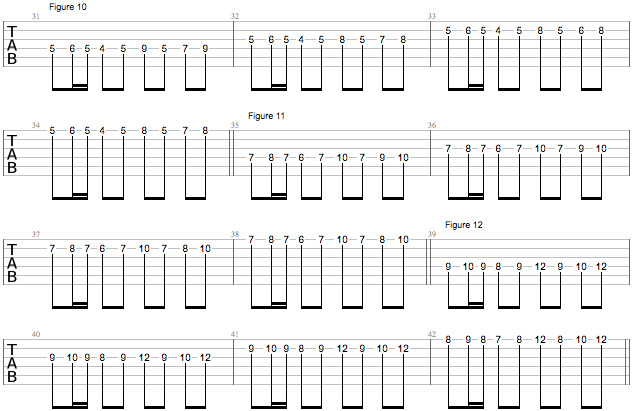
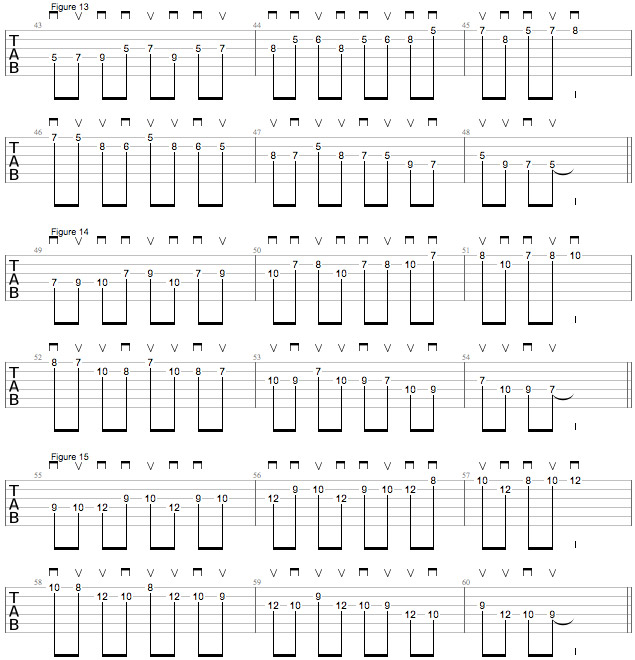
The last pattern is an economy picking pattern, so be sure to check out the picking direction signs on the tab to see whether to pick upwards or downwards.
Licks
Now I’m going to show you two different licks in all three positions. The first one is a nice one, because it’s the same in every position. Check out the video to hear to how I use it over the backing track.

The last lick is simple but very effective. Again, watch the video to see the lick put to use over the backing track.

Backing Track
Arbitrary Chromatics Backing Track
I hope you enjoyed this lesson and get to make some music with these licks. Good luck!


