Learn ‘The Levitated’
Part One
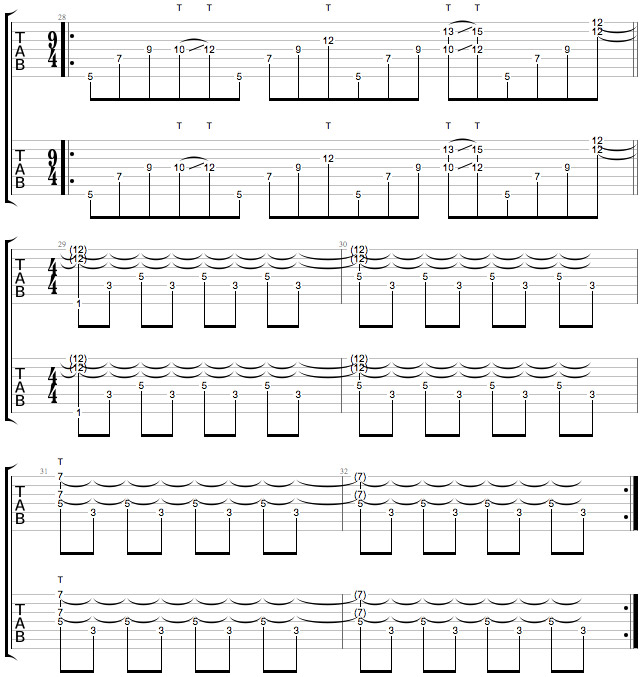
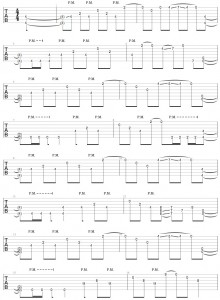
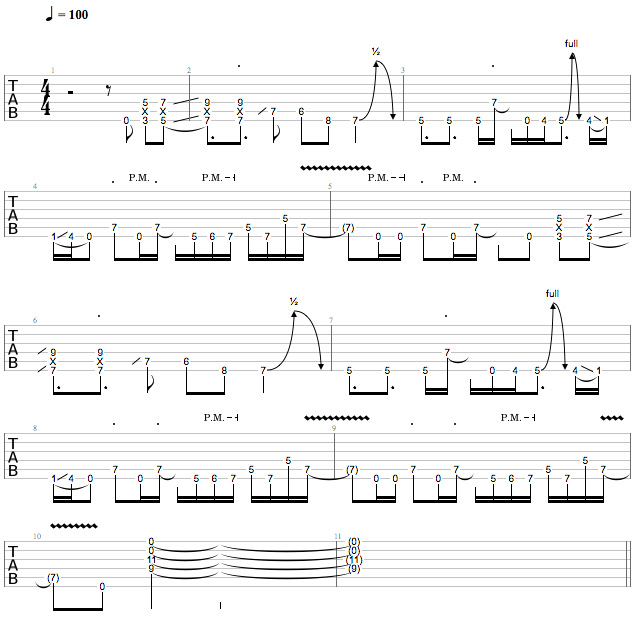
CL: This first part is the intro that I play by myself in the beginning. What I’m doing is starting on the low B string – I’m going to be going 3rd fret, 5th fret, and 6th fret on the low B. Then I’m going to skip to the A string and the D string, and I’m going to tap the 5th fret on the A string and then the 7th fret on the D string. Then with my right hand – I like to use my index and middle for these two taps – I’m going to simultaneously hit the 10th fret on the G string and then the 10th fret on the E string and pull off. I like to go in a downward motion for the pull-offs. After that, it moves to the A and the D string again, both in that power chord shape. I finish by hitting the 7th fret of the G and E strings and holding that.

Part Two
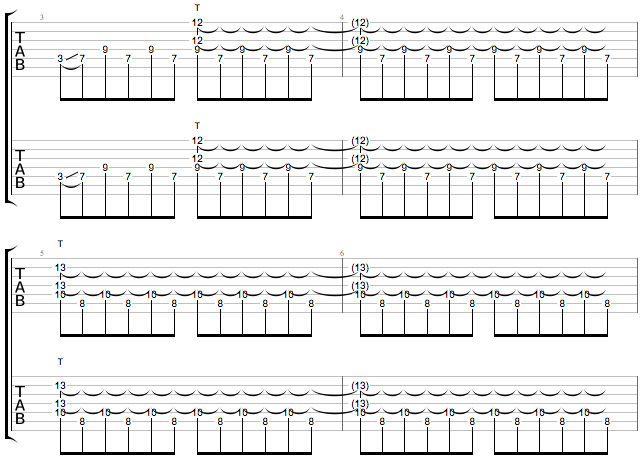
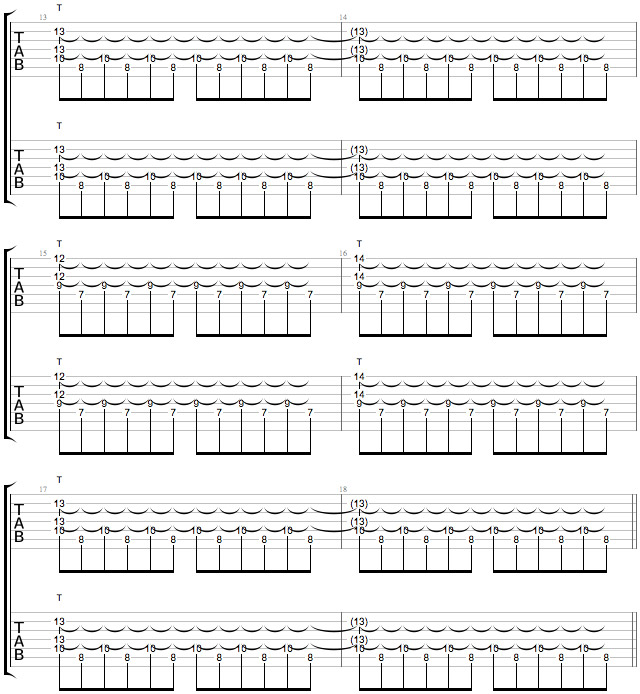
CL: I’m going to be doing some alternating tapping with the index and ring fingers of my left hand, which helps create the carnival-esque sound of this part. For this I’m starting with my index finger. I’m tapping the 3rd fret on the A string, sliding up to the 7th fret and then tapping the 9th fret on the D string with the ring finger and tapping on the 12th fret of the G and E strings with my right hand. Then I’m going from this power chord position on the D and G strings on the 7th and the 9th fret and jumping over to the 8th and 10th fret of the A and D strings, while my right hand taps on the 13th fret of the D and B strings – creating a darker sound.
Part Three
CL: Most tapping parts usually start with the index finger as the leading finger when you hit the chords, but what I’m doing is actually starting with my ring finger. So it’s an imposing idea and it’s a little unnatural, since most people like to start riffs on their index finger. Since this one starts with your ring finger, every time you hit a chord and you switch strings, you’re going to be starting with your ring finger. I would recommend, when you first start working on it, that you get this down first. Then you can work in the chords later.
Whenever I’m warming up on this song, I usually just go through the chords, so that way I can get the movement down. The hardest part for most guitar players, when they’re tapping, is they’re not able to stare at both fingers. I like to focus my eyesight on my right hand when I’m going through the chords, because the left hand is just moving the same power chord one fret down and one string down.
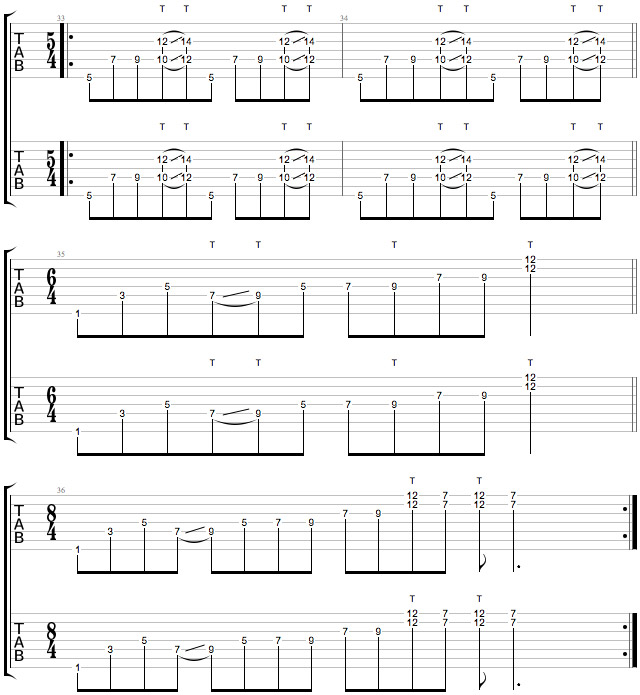
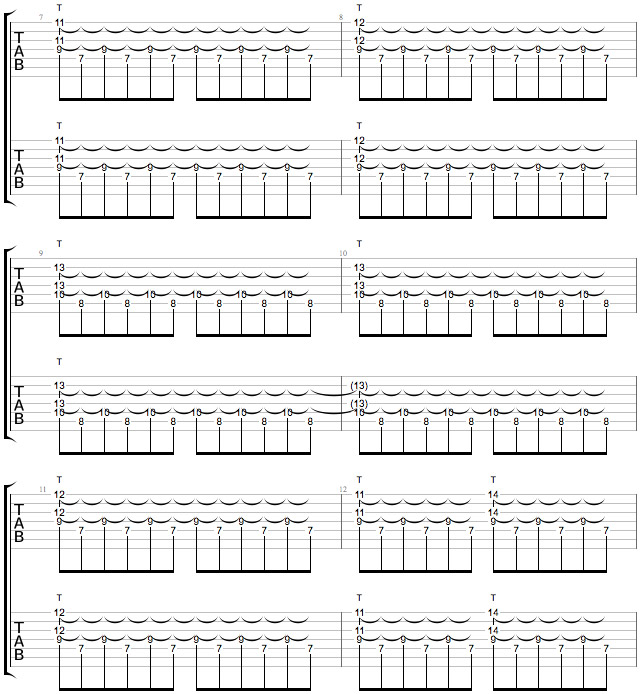
TL: The next part keeps the same idea. I just change up the order of the chords I’m tapping with my right hand. The next one’s going to start on the 11th fret and then move to the 12th fret. Then I’m going to switch chords with my left hand and move to the 8th and 10th fret of the A and D strings, and then I’m tapping the 13th fret of the B and D strings with my right hand. And then the next one basically keeps the same idea but then I’m going to the 12th fret, 11th fret, 14th fret, and then back to the 13th fret. And for the very last one I’m going to go continue the left hand pattern and tap the 12th and 14th fret, and then go back to the 13th.
Part Four
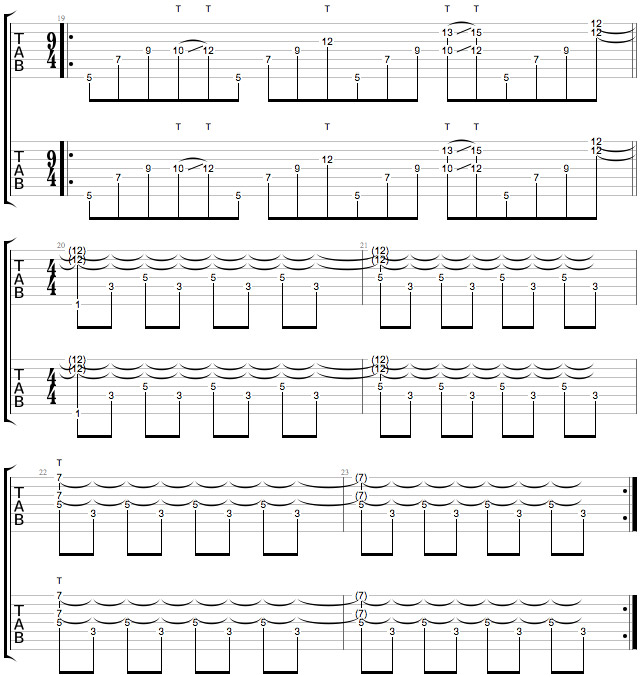
CL: This next section is in 9/4 and it involves a little more individual finger work. I’m going to be doing some chords with the right hand – just octave shapes with slides. I recommend using your strongest fingers for tapping, which would be index and ring for these kinds of patterns. Some people like to use index and pinky because of the four-fret spacing, but I recommend that you stick with your stronger fingers for this, because it’s a little bit tricky.
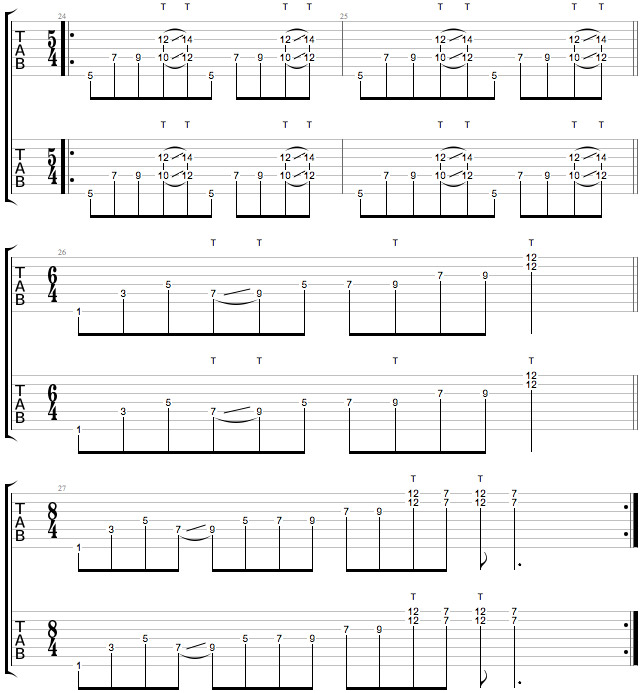
The section after that in Measure 20 is back into 4/4, and for that I’m going to jump to the 3rd fret with my left hand. When practicing this, make sure you’re looking at your left hand here, and just know that you’re going to be tapping the 7th fret with your right hand. Then I’m going to go back to the 9/4 section, and then back to the 4/4 section. The next section in Measure 24 is similar to the 9/4 section but is in 5/4. The 6/4 to 8/4 section after that in Measure 26 is the most complicated part of the piece in terms of visualizing the fretboard.
Part Five
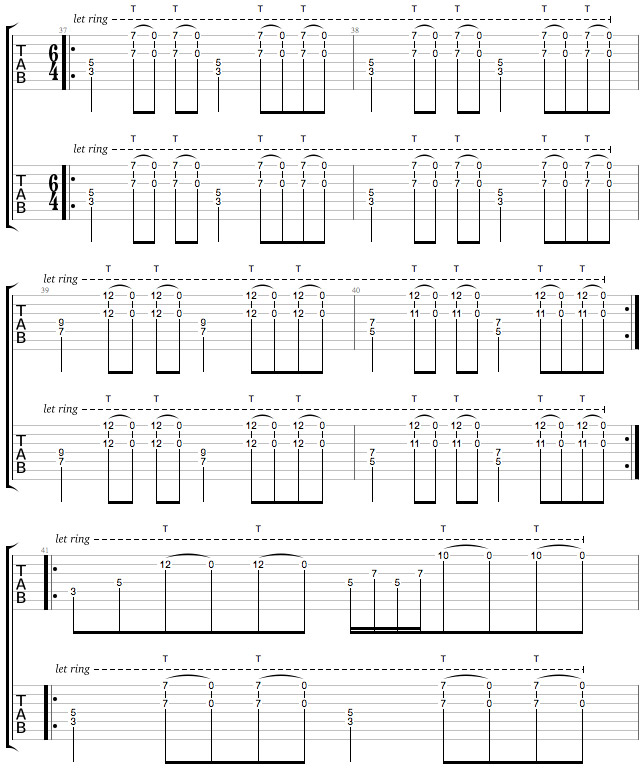
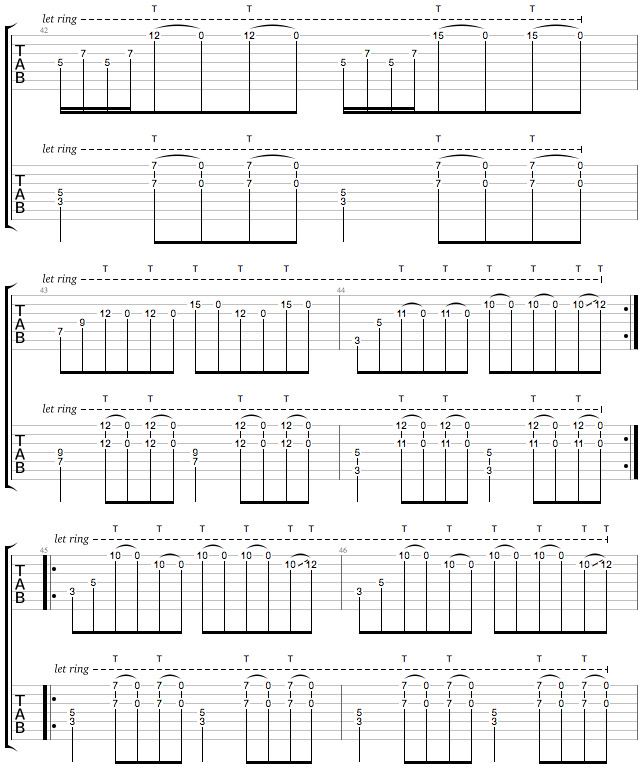
TL: Coming into the last part of ‘The Levitated’ in Measure 37, I’m going to be doing a power chord shape with my first and third finger, 3rd fret and 5th fret on the A and D strings. I’m basically just tapping the 7th fret on the high E and the G strings – I’m going to do that four times and then move my left hand up to the 7th and 9th fret and tap the same two strings with my right hand at the 12th fret twice. Then I’ll scoot over to the 5th and 7th fret, and this time keep the 12th fret on the high E string and play it with the 11th fret on the G string twice.
For my part, everything stays the same except for one chord. I’m going to keep the same first two chords, but for the third one, I’m going to keep the same chord shape with my right hand, but instead of doing the power chord shape on the 5th and 7th fret, I’m going to hold a G octave shape at the 3rd fret of the low E string and then the octave of that. And that’s only for the third and fourth time we go through that progression – after that I go back to the original three chord shapes.
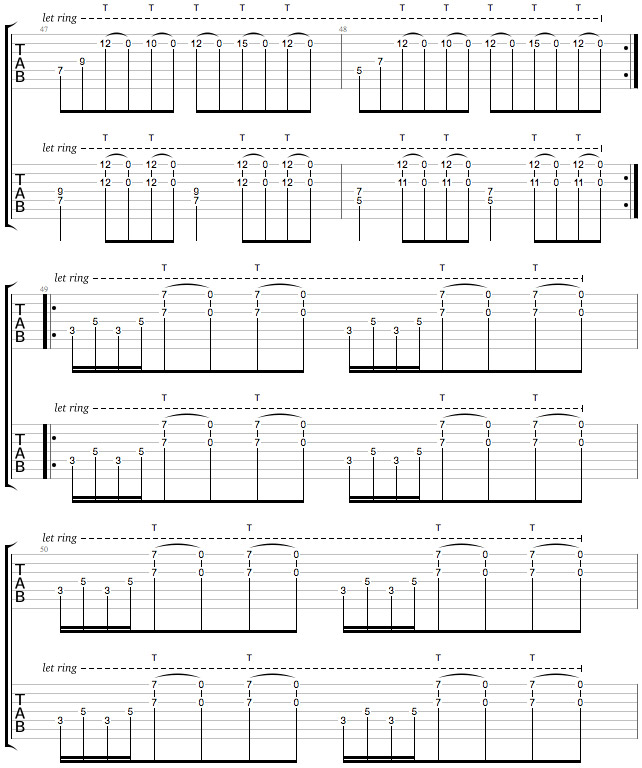
CL: In Measure 41, after we play the chord section two times through that Travis just demonstrated, I go through and do a layered part with 16th note flurries in the left hand. Now for this section, the hardest part is when it jumps down and you’ve got the 16th note bunches with the left hand, so what I recommend is just working on that as much as you can first. In Measure 45, Travis continues on with his chords after my first layered part, and I play a second layered part twice over his chords.
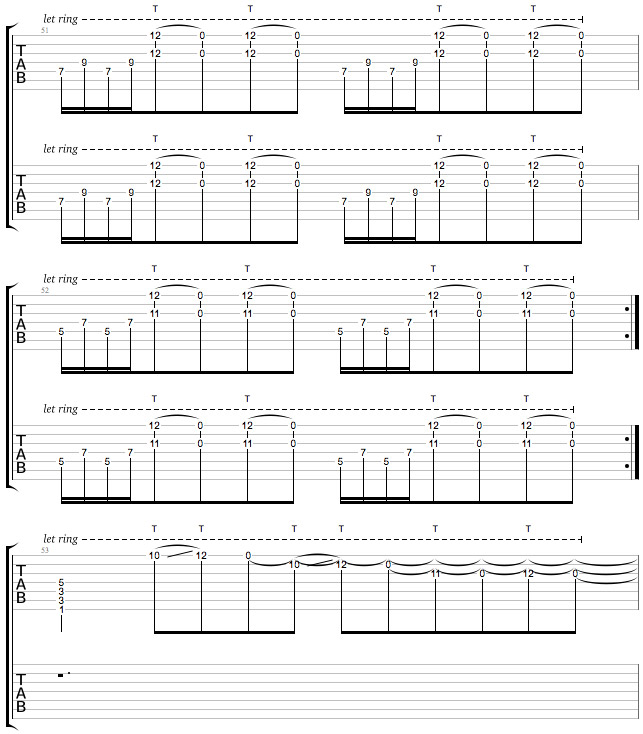
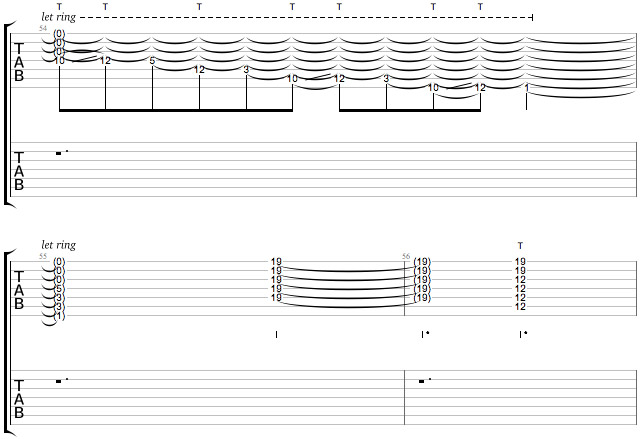
After that in Measure 49, we come in together to do this section with 16th note bunches for the next ending. At the very end of the song in Measure 53, I’m actually just holding a 1-5-1-5 chord with my left hand. So it’ll just be 1st fret, 3rd fret, 3rd fret, 5th fret, starting on the low B. I’m just hammering that chord on after the final chord progression, tapping over it and finishing by tapping on the 19th fret harmonics and then the 12th fret harmonics.
[Special thanks to Chris Robinson for his great intro and camera work.]


