Hi, everybody! Thank you for checking out this lesson. I will be discussing my two-hand tapping technique, as well as showing you one of my tunes, ‘West Tide.’ Let’s get started!
Introduction
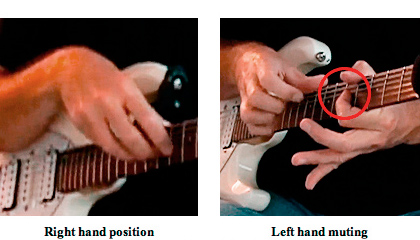
I’ve been developing and using my particular tapping technique for a little over 30 years now. My right hand, or my tapping hand, has a 45 degree angle to the neck of the guitar and I keep my thumb on top of the neck as an anchor point. My fingers are slightly arched and I tap with the index, middle, and ring fingers, which I call T1, T2, and T3.
What sets this technique apart is the philosophy behind it – it doesn’t sound like a tapping technique. It’s definitely a legato sound, of course, because I’m using hammer-ons and pull-offs and no guitar pick. But all of my phrasing and improvisation is based around my two-and-two system. I’ve taken great pains and strides over the years to not make it sound like ‘Don Lappin’s Tapping Licks,’ if that makes any sense.
I want to give you a very brief overview on how to physically utilize this technique with the hammer-ons and pull-offs. Again, my right hand is at a 45 degree angle, my thumb is on top of the neck as an anchor point just like the left hand, and my fingers are arched. The hammer-on is very simple. We’re just going to hammer-on D on the 7th fret of the G-string.

Next, we’re going to pull-off to C on the 5th fret of the G-string. Note that the pull-off is not in a downwards motion as in many techniques – we’re actually going the opposite way. Think of this almost like a classical technique. We’re actually going to pluck the string after I attack it to ring out the note in the left hand.
Whatever string I’m on, the tip of the left-hand finger needs to be up against the string above to properly mute it. This is very, very important. Otherwise, it’s going to ring out and you don’t want that, obviously. Practice this exercises with all three fingers (T1, T2, T3). That’s the basic hammer-on and pull-off technique for my system.
West Tide – Part 1
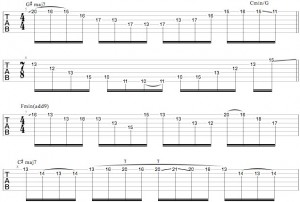
Let’s take a look at a melody to one of my tunes, ‘West Tide.’ We could think of the melody in two sections: the 4/4 section and the 3/4 section. The 4/4 section is based in E Mixolydian, which is the 5th mode of A major. The basic chords are E major to D major, and I throw an A major in there, as well. Then it modulates to the key of G, where it’s basically a I to IV major in the key of G.
The chord structure I’m actually using for this is what I call a ‘barre chord arpeggio.’ Basically, I’m taking a regular E major and a D major barre chord and I’m turning it into a tapped shape. I start with my left hand for an E at the 7th fret, and then my two right-hand fingers play the 5th and the root on the D and G-strings.
Then I’ll play the next note with my left hand, and the beauty of it is that I can move it around to other notes within the key. I could play the actual bar chord itself by just hopping over with my left hand and playing the 3rd on the B string.

Then you can vary the pattern by changing the top note. It’s the same concept I used to come up with the main melody for ‘West Tide’:

So, I start out with an E major triad and then I drop down to D major, which is what makes it mixolydian. The E major triad repeats and then I hop up and play the D major triad arpeggio higher up on the neck, followed by an A major triad arpeggio. Before the transition to G major, I do a little transition based on a D major shape with the 3rd, F#, in the bottom.
That brings us up to the first ending, and I’m actually going to talk about the first and second endings together. We’re starting off with that G major, and then we’re going to bring it up to an A. Note that there are some triplet figures amidst the eight-note streams. Check those out and be careful with them. The second ending is a simplified version of the first ending – they are all the same notes, but it’s just without the triplet figure.

West Tide – Part 2
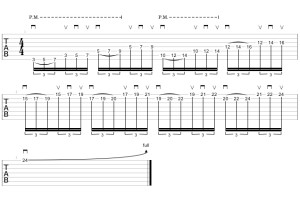
That brings us to the 3/4 section of the tune. We’re still in E mixolydian and everything quiets down. Here we have a single line with a syncopated rhythm based around sixteenth notes. You can play the E at the 7th fret of the A-string with the first finger of your right hand, and then you can play the B on the high-E string with any finger of your left hand. I use my second finger. Here is the rhythmic pattern for this section:

Just practice that at a very slow tempo until you feel comfortable with the syncopation. Be sure to note the staccato articulation. Then it’s just a matter of moving all the notes around. This is how the melody goes:
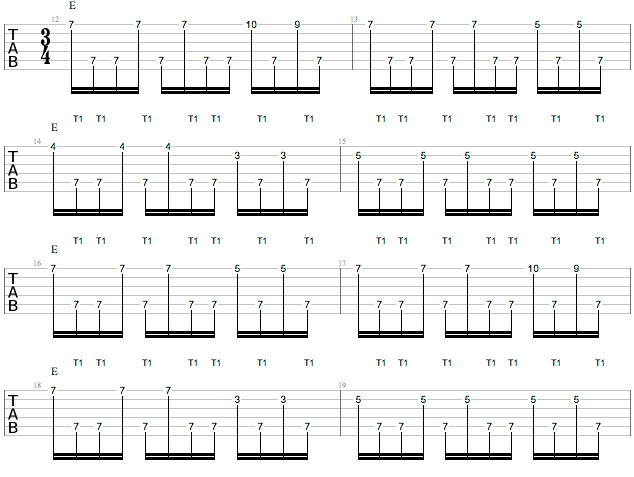
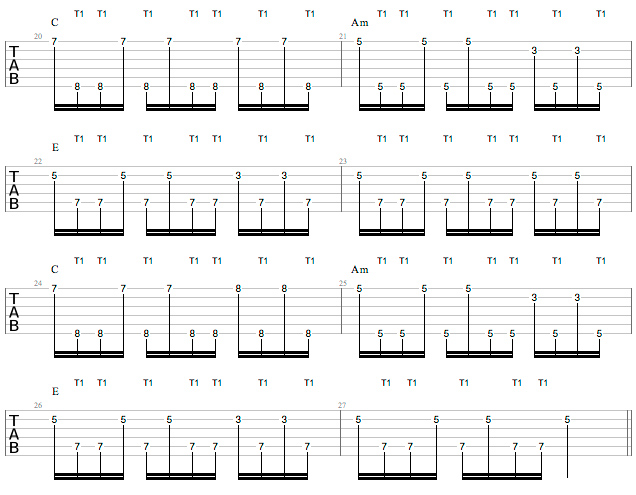
At that point, we’re coming out of the E mixolydian thing and shifting into a C, Amin, E, E progression, which repeats twice:
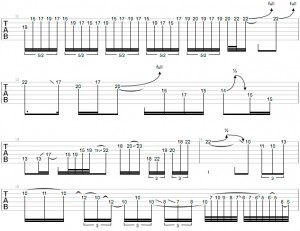
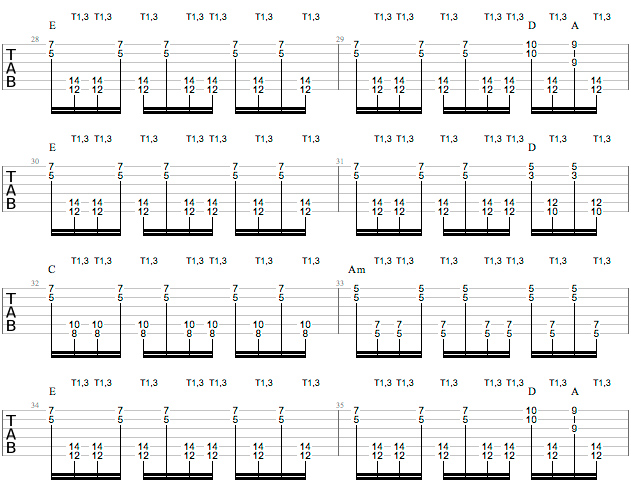
After we do all that, things get a little bit tougher, because now we’re going to use double stops. We’re actually going to be playing power chords with both hands. All the double stops in the right hand will be played on the low E and A-strings, which is basically to prevent my hands from getting all tangled up during some of these changes.
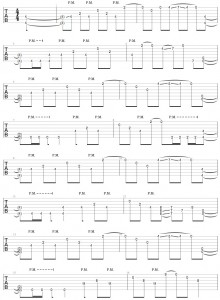
This section follows the same rhythmic syncopation as the previous one, except we’re using double stops the whole time. First, get comfortable with using power chords in both hands by playing the 5th and 7th frets on the B and high-E strings with the left hand, and the 12th and 14th frets on the E and A-strings with the right hand. Get used to that motion and then play it through the same syncopated rhythmic pattern:

This is where a damper really comes in handy. It’s impossible to keep everything muted, because we really have to attack this hard. Once you’re comfortable with the patterns, tackle the remainder of the melody:
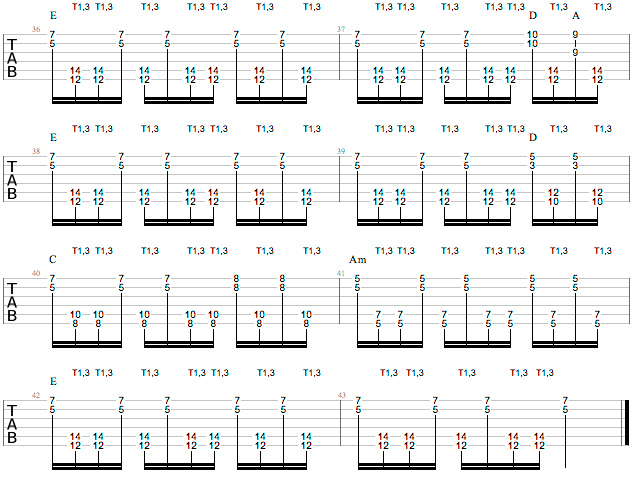
That just about wraps up this lesson! I hope you enjoyed it and got something out of it. If you’re interested in learning more about me, my music, and my playing, please visit DonLappinMusic.com.


